Wednesday, 4 May 2016

Barrel Bag Sew- Along Instructions: Week 1

Are you sitting comfortably? 

Then let's begin our sew-along!


How To Make a Barrel Bag
How To Make a Barrel Bag 


Step 1 was to prepare your fabrics, which is why today we are starting with:


Step 2:

Cut Out Your Pattern:


Do you remember that I mentioned a 26cm diameter plate? Well, I'm sure you will have guessed that this is for making the ends of your bag! 

Draw around your plate (or use a compass to draw a circle this size), and cut a paper pattern (no need to add any extra seam allowance, this is already included).


barrel bag pattern
26cm Circle


Fold the circle in half both horizontally and vertically, and mark quarters around the edge (e.g. 12 o'clock, 3, 6, and 9). You can use a notcher here if you have one. 


Paper Pattern with Notches


Other Pattern Pieces: 


Cut a paper square with sides measuring 19cm for the pocket pattern, and cut a paper pattern for the main body of the bag measuring 76.5cm x 52cm.

It pays to be as accurate as you can be at this stage, so it is a good idea to check that your corners are right-angles and your sides the correct length. Again there is no need to add any extra seam allowance as it is already included. 


Cut Your Fabric:


Pin the pattern pieces carefully onto your fabric and cut as follows:

• cut two circles from main fabric,
• cut one piece for the body of the bag from the main fabric (line up one of the edges with the straight of grain),
• cut one pocket square from main fabric and one pocket square from contrasting fabric (again, cut along the grain line). 


Making Bias Binding:


Taking your contrasting fabric (my Marble Indigo cotton) we are going to make some bias strips, which we will use for binding and for piping. 

This is where your graders square (if you have one) will come into its own: line up one of the shorter sides of the triangle with the selvedge and mark down the long edge of the tool- this will be at 45˚ to the straight of grain, or the bias. Take care not to drag on the fabric as you go. 


graders square tutorial
Using Graders Square


You can then use the markings on the plastic (seen here in the bottom of the picture) to help you draw a series of lines running parallel to the first one, and draw a number of strips which run along the bias. 

If you don't have a tool like this, use a small set square to find the bias, then use it in conjunction with a long ruler to mark your strips. 

You will need roughly 2m of 4cm-wide binding, and 2m of 3cm-wide binding. Do all of your drawing before you begin to cut. 


homemade bias binding
Rolls of Bias Binding Ready to Use
notice the different widths


Cut along your lines to make strips, and join them together to make long rolls of bias binding as follows: to determine whether the ends of your strips can be joined, lay them with right sides (RS) up, and if the angles run parallel you will be able to join them.


homemade bias binding
Edges Run Parallel


Take one strip and turn it over, laying it on top of the other- now RS's face each other. 


joining bias strips
Joining Bias Strips


The stitch line will be 1cm from the raw edges, so make sure this is where the edges intersect, and that this is the point at which the right angles appear along the edges- stitch line drawn below. 
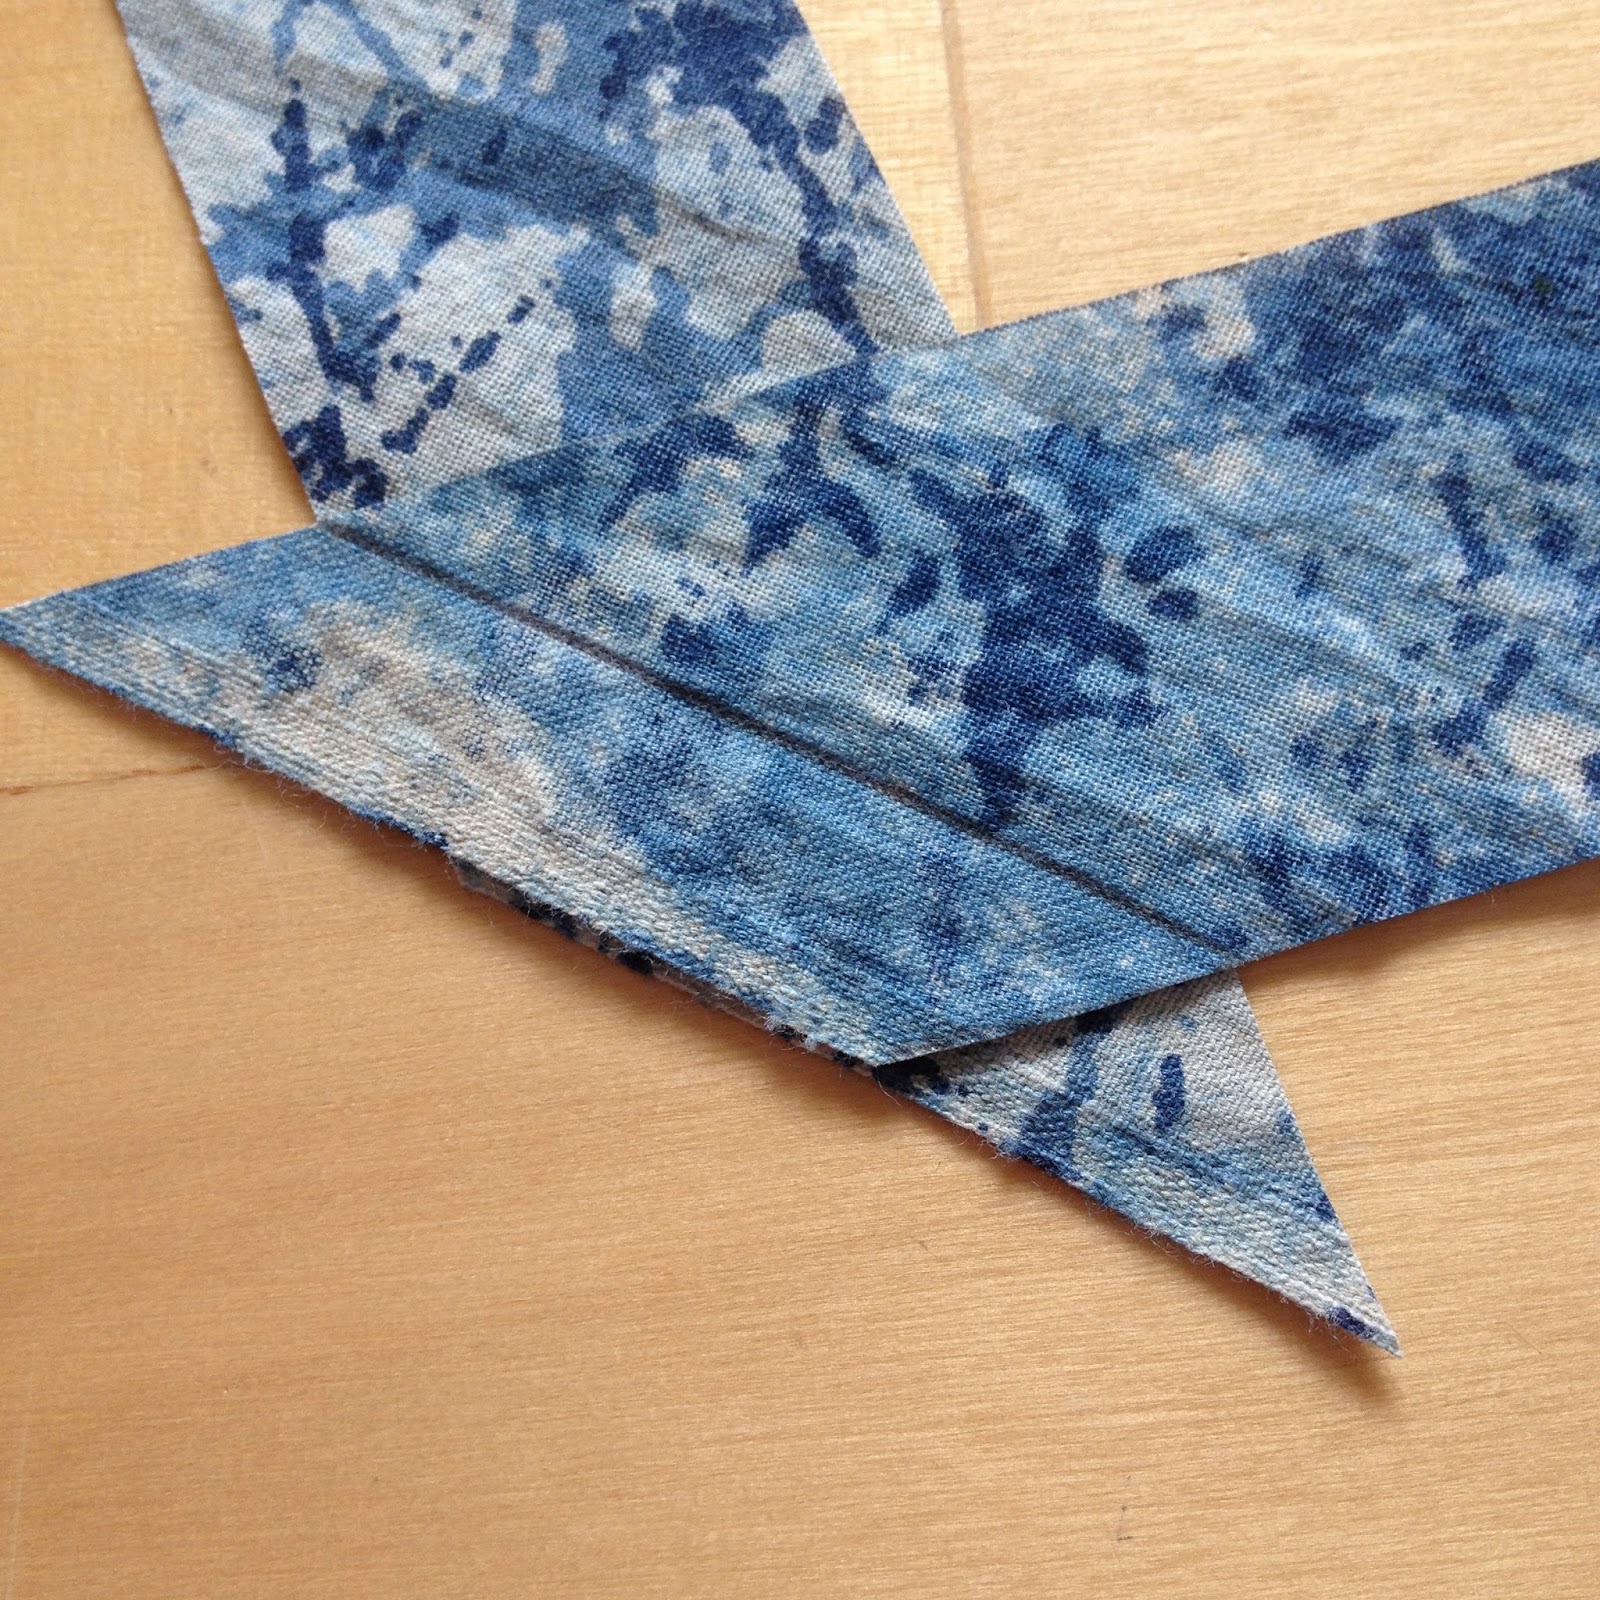

how to join bias strips
Stitch Line


Cover Your Piping Cord:


You will need to attach your one-sided foot to your sewing machine. If you're not sure what this looks like, take a look at the image below: I always think it looks like a ski. 

It will not sit in the middle of the ankle, you will have to attach it to one side- attach it so the foot it positioned to the right of the needle. 

In some machines, the position of the foot is adjusted by loosening the screw, sliding the foot to the desired position and tightening it back up. You can do this with the needle down to get a really close hold on the fabric. 


how to make piping cord tutorial
Making Piping Cord


Take your 3cm binding, and roll it around your piping cord. Take care that the raw edges of the bias binding are level with each other and that the cord runs down the centre of the bias strip. 

Using your one-sided foot as shown in the photo, sew a line of stitching running along the cord- don't stitch through the cord itself but try to keep the stitches close to it to hold it in place. 


Lesson One Done!

That is as far as we are going to go this week, I hope you enjoy it and I look forward to you sharing your progress with me on twitter and instagram. 

If you need anything to be clarified please go ahead and ask, and if you really don't do the metric system I may be persuaded to offer imperial conversions... 

#MMMay:

Are you following #mmmay on social media? Me-made May is the perfect opportunity to show off your skills, so don't forget to add this tag too to your barrel bag pictures.


Following the Instructions:

I will be putting up other blog posts between the sew-along, so don't forget that you can click on the words 'sew-along' in the word cloud to the right to see everything in this sequence. 


Sunday, 1 May 2016

May Monthly Giveaway: Debbie Bliss Paloma Yarn & Crochet Kit

Free Stuff!


Due to the success of my recent giveaway, you'll be pleased to know I am going to make it a regular monthly thing, hurrah!

Each giveaway will be open for a whole calendar month, so you have the whole of May to get excited about this one, and then I will announce the winner and the next giveaway on June 1st.

What's the Catch?


No catch! There are no conditions attached, I'm just giving away either treasures from my stash, or items kindly provided by other companies. I mean I hope that you will stay a while and read some other posts, perhaps even leave the odd comment, but that's entirely up to you. 

Usually it will be yarn or fabric themed. 

This is open to everyone, wherever you are in the world, unless I occasionally specify postage restrictions. 

If you'd like to be considered please just leave me a comment below, and that's it, consider yourself entered- it really is that simple. If for some reason you can't comment then you can use the contact form instead. 

Tip: to be sure you never miss a giveaway, or more importantly a notification that you might have won, why not subscribe to my blog...? It's easy, and you'll find where to do it on the top right ---->

So, down to business:

May Giveaway:


Now, I know it's only May, but I know that all you yarnies are already thinking about next winter. And with that in mind I have put together a little kit to kick start your winter woolies: 


crochet kit giveaway
Crochet Kit Giveaway

Win a Crochet Kit


I am offering a kit I have put together, comprising of 2 skeins of Debbie Bliss Paloma yarn, a Knit Pro crochet hook, and a vintage button, plus an email copy of my Sundance Kerchief broomstick crochet pattern. 

The yarn is a warm autumnal ochre, shade 42008. 


crochet kit giveaway
super squishy yarn!


crochet kit giveaway
Knit Pro crochet hook

crochet kit giveaway
beautiful statement button

you can make this!


Simply comment to enter, and thank you! 

Wednesday, 27 April 2016

Announcing The Barrel Bag Sew-Along, with Merchant & Mills

sewing tutorial
sewing instructions


Announcing the Sew-Along:


I am delighted to announce that I am hosting a sew-along, sponsored by Merchant & Mills.

How it works: 


Each Wednesday I will upload a set of clear instructions for you to complete at your leisure to take you through every detail of how to make your very own barrel bag, in small manageable stages.

barrel bag sew-along
The Sew-Along

About the Bag: 


I love the preppy style of barrel bags, but I wanted to soften it a little. The relaxed and slightly slouchy result is perfect for me to use as a gym bag: it is quite capacious but with a proper fastening, and I can either throw it over my shoulder or grab the handles to rummage through the contents. 

I hope I've come up with something that will be equally useful to you, be it for a day out, an alternative to your handbag, an overnighter, for school or college... or whatever you choose. A barrel bag is also gender neutral, so this could be a great make for a man. 

How to make a barrel bag


I'm waiting a week before I launch in with instructions to allow you to gather your materials and equipment. 

Merchant & Mills:


If you've never encountered Merchant & Mills at their shop, or selling elsewhere then you have missed out! Their website is perfectly lovely, and tells you pretty much everything you need to know, but there is nothing quite like seeing the colours of all of those beautiful fabrics in the flesh and engaging with their really tactile properties. Yes, dear readers, I have spent some considerable time loitering, planning projects, and, um, shopping!

posh haberdashery
what's in this beautiful package?!

Therefore, I am thrilled that they have supported this sew-along by providing my fabrics, hardware, and webbing. Thank you so much to Carolyn, and also to Michelle. 

I strongly recommend that you order your fabrics and hardware from their website, or pop down to their shop in Rye, East Sussex, if you can.


What You Need to Make a Barrel Bag:


Fabrics:


It took me (somewhat characteristically) a long time to decide which fabrics to plump for, but for my main fabric I chose Quink linen: it is substantial and yet soft, and I love the way has amazing depth of colour, and yet antiques with use. It is also beautiful on the 'wrong' side, which means the inner of my bag is as beautiful as the outer (I made use of this contrast on the pocket). You will need one metre.

For the contrasting fabric I went for an Indian cotton, in marbled indigo. I have used these Indian cottons before, so I knew that they handle really well and have a nice dry sort of feel. 

The straps are vital to this bag, so I suggest that you don't scrimp on your webbing. You will need four metres, which seems huge I know, but I promise you it is important. I went for 50mm blue grosgrain. 

You'll also need two metres of fine piping cord (approximately 2mm diameter), plus matching cotton sewing thread. I used Guttermann shade 5412 which is a perfect match.


Merchant & Mills fabrics
'Quink' linen, Indian cotton, 5mm grosgrain

Hardware:


A beautiful bag deserves top quality hardware!

You will need a zip. I went for a chunky metal one, measuring 45cm long.

To make this bag you will need two D rings, two paraclips & four rivets. 

brass fittings from Merchant & Mills
beautiful hardware

Tools:


You will need a sewing machine with a good sharp needle, plus a one-sided foot. 

You'll need your general sewing kit (hand needles, pins etc). 


sewing essentials
sewing kit


Also on the list of essentials are good fabric scissors, drawing tools for both paper and fabric and pattern paper, (unless you want to work straight onto the fabric, in which case good fabric markers will do), including a long straight edge. 


fabric pans
Pilot 'Frixion' pens: my favourite for fabric marking as they iron off easily


A grader's square is extremely useful, as is a 26cm diameter plate. 


http://www.eastmanstaples.co/index.php/metric-graders-square.html
grader's square


For attaching the rivets: a hammer and an awl.


Skills: 


This sew-along will suit an adventurous beginner or someone who has intermediate skills. We will be putting a zip in, sewing curves and using bias binding (which I will explain in full). The really make-or-break skill is careful marking out though, for which no experience is necessary. 


How to Make a Barrel Bag:


Step 1: Preparation

Wash your fabric as per the instructions, and lay flat to dry, or hang from the selvedge on the line. Give them a careful press. 

equipment to make barrel bag
26cm dinner plate

Sew-Along With Me: 


So, I hope you will join me next week for the first set of instructions in the sew-along. As I mentioned, each Wednesday the next instalment will be uploaded. You could consider subscribing to ensure that you don't miss any stages. 

I always welcome your comments, and if you get really stuck or you want to request further tutorials then please go ahead and use the contact form on the right. 

Also, I'd really love it if you tag me on instagram @stitchingfitpixie or twitter @StAustellStitch at every stage of your make: show me your fabrics and how you're getting on!


http://merchantandmills.com
Amazing giant protractor also purchased at Merchant & Mills


Sunday, 24 April 2016

Q&A: Ethical Brand 'Lost in Samsara' + Product Review

About Lost in Samsara:


So much more than a fair-trade shop, Lost in Samsara is an enterprise based on the whole philosophy of supporting less fortunate communities by sourcing beautiful products. You can read about the origins of every product (whether it has been up-cycled or hand made from scratch), and see pictures of who actually made it, and find out what your purchase will mean to the community it originates from. 

You can even join in with the Wheel Project and exchange skills with others locally. 


Up-cycled Cement Bag Hold All
up-cycled cement bag hold all


Q&A:


I was lucky enough to chat to Marvi from Lost in Samsara about the big picture. The answers that I received to my little interview really blew me away and I am thrilled to share them here: 

Stitching Pixie: How long have you been running Lost in Samsara?
Marvi: Lost in Samsara started at the beginning of 2015. We decided it was time for us to start doing more of what we believe in and after a trip to Nepal and few more conversations Lost in Samsara was born.

Stitching Pixie: As a brand, what is your primary aim?
Marvi: Our primary aim is to encourage people to change the way we consume and to ask ourselves who is behind what we have and how we dress. We collaborate with different projects around the world that employ artisans who are paid a fair wage. Most of them are women who face economical and social problems. We’d like our brand to be a bridge that reconnects products and people, encourages slow-production and promotes trade over charity. 
  
Stitching Pixie: Who is your typical shopper?
Marvi: We try to design and/or bring to the market things that are new and that can satisfy both male and female shoppers. So far, we have had people of all ages and gender, which is something we really love. 

Stitching Pixie: What's the best part of your job?
Marvi: The best part of our job is our job and we can finally say that we are happy about what we do and waking up in the morning is something we enjoy now. We also really love engaging and talking to people at the markets we do. 


ethical hold all
strong, roomy & comfortable 


Stitching Pixie: What is your favourite thing that you sell?
Marvi: We sell many different things and there is not really a favourite. We like each and every item for different reasons. Some are up-cycled, some hand-woven, some hand-knitted. Each craft reflects the country where is from and we love that. 

Stitching Pixie: Who is your heroine?
Marvi: We don’t have a heroine in particular. Our heroine is each and every woman who struggles everyday for a better life for herself and her family.

Stitching Pixie: How would you like to be remembered?
Marvi: Probably more than being remembered we hope we can have a positive impact on all the people we meet during our life. We like to think that we are all connected and that we can all have a part in telling a better story.  


adjustable shoulder strap

Product Review: 


I was given a fantastic up cycled hold-all to review. I just love the design, featuring Elephant Brand cement bags, complete with all of the original instructions and warnings. 

True to its name, the Elephant brand bag is sizeable and strong! Reinforced with a tough textile lining (complete with interior pocket), I feel like it could take me on any trip stuffed with any amount of gear. All of the hardware (the zip, the buckles etc), are lovely quality, and the bag benefits from having both an adjustable shoulder strap and a pair of webbing handles (both very tough and comfortable as you might expect). 

I tested this gorgeous bag as my gym bag for a week, and it worked perfectly: comfortable to carry and very roomy, I could throw all of stuff in there in a hurry, and better still there was plenty of space to rummage through it to find everything again! 

My only complaint? It has inspired a little bit of wanderlust in me: I cannot wait to take it on a real trip with me!

You can view this product and buy it here. I feel that for its modest price tag, this is an extremely good value bag.  


ethical hold all
shorter handles even fitted over my shoulder

Made in Cambodia, with the added benefit of empowering women and paying a fair wage, there is everything to feel good about with this bag. Perfect for however much 'wandering through' you end up doing. 

Next time I need a gift, something for my home, or another gorgeous bag, I will head to Lost in Samsara. Top of my list though would be these adorable silver stud earrings, also elephants and carefully sourced in Mexico, or if I really wanted to invest in a statement tote bag, it would have to be this Ikat weekender. 


However, the thing that would bring me back to Lost in Samsara above all is that dealing with them has been such a pleasure from start to finish. I have to recommend them as a totally feel-good brand! Thank you Alessia & Marvi! 


up cycled bag
...for all of your wanderings

Product kindly supplied by Lost in Samsara

Wednesday, 20 April 2016

Girl Talk, Lidl & The Oeko-Tex Standard

Whatever you want to call it...


If you are anything like me, the last thing you will want to spend time thinking about is your sanitary protection, feminine hygiene, or whatever other euphemism springs to mind. 


Sea Urchins have nothing to do with tampons, but this blog post was a little difficult to illustrate!

Tampons: a textile product


I confess that beyond safe disposal, I haven't given a thought to the ecology of tampons, so when I grabbed a box in a discount supermarket I was pleasantly surprised when I noticed the Oeko-Tex 100 Standard on the box. Of course these things are made from cotton, and therefore we should be concerned about where that cotton comes from. 

And after all, due to the intimate way we use these products, shouldn't we be diligent about ensuring they do not contain harmful chemicals...? Now, I have absolutely no proof that more mainstream brands of tampons contain chemicals, but I don't see them rushing to reassure us that they are not. 


Don't flush them or they will end up here!


The Oeko-Tex Standard


In case you are not familiar with the Oeko-Tex standard, it is an assurance that the product has been thoroughly and independently tested for legal and illegal harmful substances. The end use of the product and the intensity of the contact it will have with the skin is taken into account then applying the test criteria. Again this is reassuring given that we are talking about tampons. 

The Oeko-Tex 100 is not a comprehensive test for all-round ethical production (it is not a fair trade or organic certification), but, it is a lot better than having no assurances at all. And if there are no nasty chemicals in the end product, that's a good sign that the environment has been respected along the production process. 

You can read more about the Oeko-Tex standard here. 


Best Brands of Eco Tampons:


Lidl's own 'Siempre' brand of tampons, then, seem like a good bet- well done Lidl! However, if you don't shop in Lidl here are some alternatives:

Natracare, soil association certified organic cotton tampons, available from Greenfibres (don't forget to use PIXIE10 discount code): click here

Organyc applicator cotton tampons, available from Natural Collection (click banner to the left)

Veeda natural cotton sanitary products, available from Boots


Friday, 15 April 2016

Liz Earle Naturally Active Skincare Review

Skincare:

Here's a skincare confession: I am a bit lazy when it comes to my face. I always wash it in the morning, in the shower or after I work out, but I often just hop into bed of an evening without so much as the lick of a wet flannel. That's pretty lazy isn't it?

So, when I was offered the chance to try out these beautiful products from Liz Earle, I jumped at the chance to mend my ways and build up some better habits. Would it make any difference, I wondered...?


About Liz Earle:

Based on the Isle of Wight and founded in 1995, Liz Earle founded her skincare brand on the principles of botanical goodness and a fuss-free dependable routine. The brand is also committed to being environmentally friendly, which is laudable. 


Naturally Active:

There is an A-Z of ingredients on the Liz Earle website here, which is very informative, and actually flags up just how committed to the "Naturally Active" tag the brand is: it's a very long list. 

I also love this spirit of openness: we are getting smarter about what we consume in our foods, but given that the skin is our biggest organ, are we lacking behind in an understanding of what is in our cosmetics?


Liz Earle Naturally Active Skincare

The Products:

I received some Cleanse & Polish Hot Cloth Cleanser, accompanying muslin cloths, and a tub of Superskin Moisturiser.

My first impressions were of quality: the elegant packaging is neither too girly nor dripping with too much hard-sell. I loved the understated no B.S. feel of everything. 

superskin
Superskin here we come!


Cleanse & Polish Hot Cloth Cleanser:

This is sort of across between a face wash and a cleansing lotion: you apply to dry skin and wash off with the muslin cloths. This is a really pleasant sensation, and being a stress-relieving experience is  now a little part of the day that I look forward to. 

I can see why this product has won a huge number of awards: it smells really fresh and it cleans without leaving a residue or over-drying the skin. 

The muslin cloths were easy to chuck in the washing machine, although I have to confess that I did switch to my crocheted wash-cloths, which seem to work just as well. I would be interested to try the Rose & Cedrat limited edition Hot Cloth Cleanser too. 


Award-winning Hot Cloth Cleanser

Award-winning Hot Cloth Cleanser
Hot Cloths, of the crochet variety


Superskin Moisturiser:

The first sensation I had of this cream was the gorgeous smell emanating from the (very full) tub, which I suppose must be the neroli- it's heavenly. I soon discovered that the cream is very rich, and a little goes a long way. It has a shelf life of six months- I know this because I actually did wonder whether I would get through it all before it has gone out of date!

Applying it in the mornings and at night (yes indeed, check me out and my new routine!), I found my skin looked fuller and felt really supple. I definitely felt like I looked healthier, and I actually do believe that, as the packaging claims "Superskin can't turn the clock back, but helps slow the ticking". 

I found that it was fairly easily absorbed, but the little how-to-apply guide that comes with it is actually really useful. I'd never thought about the best way to apply face cream... until now.

I will continue to use the cream overnight. Although it felt like amazing protection if I was out in the Cornish elements, it was however just a touch heavy for the daytimes, especially if I was getting sweaty at the gym. I might invest in a lotion for the day times: perhaps Skin Repair light moisturiser might be a better go-to option if you don't have really dry skin. 

Superskin Moisturiser with Neroli

how to apply face cream guide
How to apply face cream, who knew...?

The Verdict:

It felt like a real treat for my face (as well as my sense of smell) to use these products. I love the fact that they use natural ingredients, and I would definitely shop the Liz Earle range, especially as I want to get behind the company's aims. 

If, like me, you struggle a little bit with good skincare habits, a new regime that feels like a few minutes of luxury might be just the ticket! 


Products kindly supplied by Liz Earle Naturally Active Skincare, opinions are my own.

Friday, 8 April 2016

Coral Colour Pop!


Trend Alert: Coral

coral favourites for spring
Seasalt scarf from a charity shop, People Tree stripes,
and floral fabric from the V&A, from which I sewed a top.


I am really loving the current trend for all things coral. For those of us who aren't that fond of pink, coral is an accessible way to feel feminine and spring like. Coral is flattering on all skin tones, and whilst it typically has a more lighthearted, holiday vibe, I reckon you could you could work it into a formal wardrobe with careful selection of the right pieces. 


ss16 coral trend
Whistles silk dress: a few years old but still lovely! 


My Coral-coloured Wardrobe:


Handmade top, crops from People Tree

Top from People Tree, handmade skirt

Linen top from Sweaty Betty


How do you wear coral...?

You can of course wear head-to-toe coral, if you are having as much of a passion for the colour as I am. But in the unlikely event that you want to dilute it just a little bit, coral seems to work well with cream, grey, and (my other favourite) indigo blue. 

You can go for just a small accent, a whole block of colour, or even patterned separates. Stripes are always good.

How do you wear yours?

Where to shop for coral colours:

Ethical style from around from around the web:

There are plenty more coral-coloured beauties on the People Tree website, or, try my picks below: 

Coral Cowl from Greenfibres


 Recycled Plastic Ring, from V&A
Recycled Plastic Ring from The V&A


 Chilli Chocolate from the Design Museum Shop
Chilli Chocolate from the Design Museum Shop


Debbie Bliss Eco Baby Yarn


Click below to shop more great ethical styles from East:

Mid Season Sale